
Preventing Logo Peeling on Work Clothes: 2026 Guide


Table of Contents
- Why Heat-Transfer Logos Peel Off Work Clothes
- Correct Heat Press Temperature, Time and Pressure for Lasting Adhesion
- Preparing Garments and Choosing Transfer Materials That Hold Up
- How to Wash Clothes With Printed Logos Without Causing Damage
- How to Dry Printed Work Clothes Safely
- How to Fix a Peeling Logo on a Shirt: Repair Methods That Work
- Workwear Logo Care Instructions for Employers and Uniform Managers
- Conclusion
- Frequently Asked Questions
Last Updated: October 6, 2026
Why Heat-Transfer Logos Peel Off Work Clothes
Logo peeling on work clothes is almost always heat, friction or chemistry working against the adhesive holding the transfer in place.
Heat-transfer vinyl is a plastic film bonded to fabric with a heat-activated glue.
At Hi Vis Work Clothes, we see this constantly with branded hi-vis shirts and jackets worn hard and washed often, the logo fails long before the garment does.
Most peeling comes down to five causes:
- Too much heat in the wash or dryer
- Abrasion from rough surfaces or other garments
- Harsh detergent or bleach breaking down the adhesive
Control the heat, friction and chemicals, and most logos will outlast the shirt.
Application Method Breakdown: HTV vs Screen Print vs Embroidery
The decoration method changes how you should care for the garment.
Heat-transfer vinyl (HTV) is a coloured film cut to shape and pressed onto the fabric.
Screen print pushes ink through a mesh and cures it into the fabric.
Embroidery stitches the logo directly into the fabric with thread.
| Method | Peeling Risk | Best For | Watch Out For |
|---|---|---|---|
| Heat-transfer vinyl | High | Low-cost bulk runs | Heat, abrasion, stretching |
| Screen print | Medium | Flat fabric, large runs | Cracking, fading |
| Embroidery | Very low | Heavy-use uniforms | Cost, snagging on thread |
If your team works outdoors or washes uniforms constantly, embroidery is the safer long-term bet.
Correct Heat Press Temperature, Time and Pressure for Lasting Adhesion
The single biggest cause of peeling is a bad press. Get the temperature, time, and pressure right and the bond will hold for years.
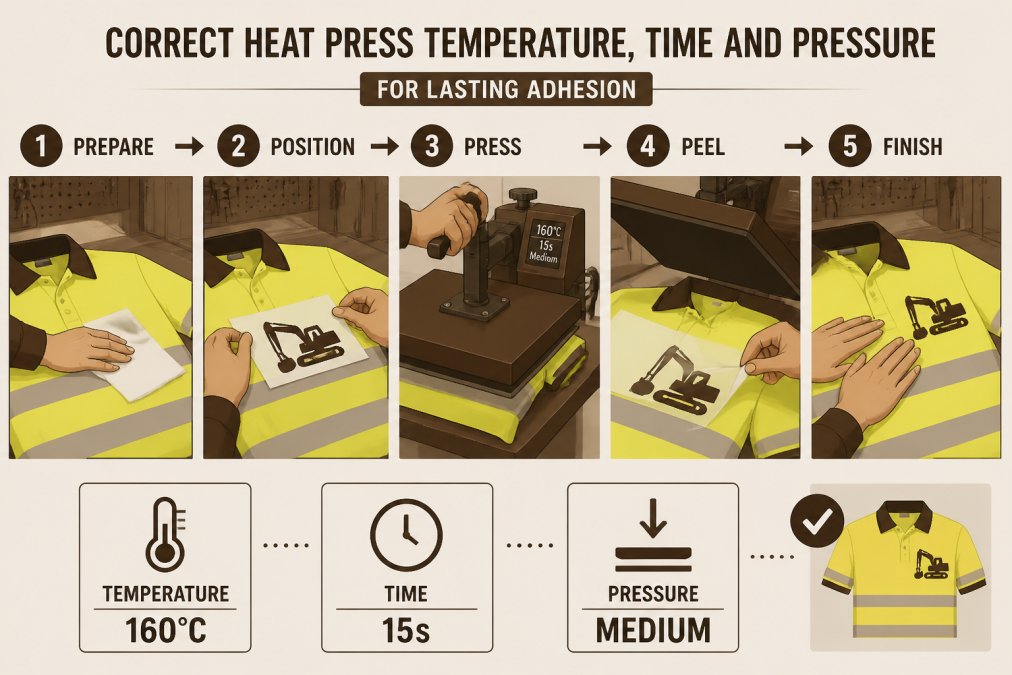
Heat-transfer vinyl needs three things to bond properly: the right heat, enough time, and firm, even pressure. Miss one and the adhesive never fully activates.
As a general guide:
- Temperature: 150-160°C for most HTV
- Time: 15-20 seconds per press
- Pressure: firm and even, not light
Always check the vinyl manufacturer's instructions, because brands vary.
Temperature Settings by Fabric Type
Fabric type changes everything. The same vinyl that bonds perfectly to cotton can scorch polyester or fail to stick to a coated windbreaker.
- Cotton: 160°C, holds heat well, most forgiving
- Polyester: 140-150°C, lower to avoid melting or dye migration
- Cotton-poly blends: 150°C, a safe middle ground
Preparing Garments and Choosing Transfer Materials That Hold Up
A clean, dry, flat garment is the foundation of a logo that lasts. Skip the prep and even a perfect press will fail.
Before pressing, always:
- Pre-press the garment for a few seconds to remove moisture and wrinkles
- Make sure the surface is completely dry and free of lint
- Position the transfer carefully and hold it in place
The material matters just as much. Cheaper vinyls use weaker adhesives and thinner films, fine on day one, then lifting at the edges within weeks. For workwear, choose transfers rated for repeated laundering and abrasion. If your supplier cannot tell you the wash rating, that is a red flag.
How to Wash Clothes With Printed Logos Without Causing Damage
Washing is where most logos die. Get the routine right and you will add years to the print.
The rules are simple:
- Turn the garment inside out before every wash
- Use cold water (30°C or lower)
- Choose a mild detergent, never bleach
Turning the shirt inside out is the single most effective habit, it puts fabric between the logo and everything else in the drum, cutting abrasion dramatically. Bleach and harsh detergents break down the adhesive over time, even if the print looks fine after one wash.
How to Dry Printed Work Clothes Safely
Air-drying is the safest option for any printed or heat-transfer garment.
Heat kills logos, and a tumble dryer is pure heat plus tumbling friction.
Better options, in order of safety:
- Line dry in the shade, inside out
- Hang dry indoors on a rack
- Tumble dry low only if you have no other choice
- Never tumble dry on high heat
Direct sunlight fades both fabric and print, so shade is better than full sun. If you hang garments outside, keep them inside out.
The same logic applies to ironing. Never iron directly over a printed logo. The heat will melt or lift the transfer.
How to Fix a Peeling Logo on a Shirt: Repair Methods That Work
A lifting logo is not always a lost cause, but the wrong repair can make things worse. The safe approach depends on how much has lifted, the vinyl's condition, and how the garment is used.
Start by identifying the decoration method. Heat-transfer vinyl (HTV) and direct-to-film (DTF) sit on top of the fabric and can sometimes be re-pressed. Screen print is cured into the fabric and cannot be re-bonded with heat, if it is cracking or flaking, it needs professional re-printing or replacement.
Safe Repair Decision Tree
Use this to decide whether to repair, escalate, or replace:
- Small edge lift (less than 10 mm), vinyl still flexible and intact? A low-heat re-press is usually safe. Clean the area, reposition the edge, cover with parchment paper, and press at the vinyl manufacturer's recommended temperature for 15-20 seconds. Let it cool before removing the cover.
- Lift along one full edge or a corner, vinyl still intact? Re-press first. If it lifts again after one wash, the adhesive is spent, replace the transfer or the garment.
- Logo on high-visibility safety wear with reflective tape? If the repair touches or overlaps the reflective tape, stop. Damaged reflective tape reduces visibility and may breach AS/NZS 4602.1 requirements for high-visibility safety garments. Replace the garment instead.
Never repair a logo on high-visibility safety wear if the repair affects the reflective tape. Damaged reflective tape reduces visibility and can put the wearer at risk. Replace the garment instead.
Step-by-Step Re-Press for a Small Lift
- Clean the area. Make sure the lifted edge and the fabric underneath are dry and free of lint.
- Reposition the edge. Press the lifted vinyl back down flat.
- Cover with parchment paper or a pressing cloth.
- Press with a heat press at the vinyl's recommended temperature for 15-20 seconds.
- No heat press? Use a household iron on a low-to-medium setting with no steam, pressing firmly for 20-30 seconds. Do not glide the iron, press and hold.
- Let it cool before peeling the cover away. Peeling warm can stretch the vinyl.
- Test after one wash. If the edge lifts again, the adhesive has failed and replacement is the better option.
When to Escalate to Professional Repair or Replacement
Some repairs are not worth attempting on workwear. Escalate or replace when:
- The garment is worn in a role where logo visibility is part of compliance or brand requirements.
- The fabric under the logo is damaged, stretched, or contaminated with oil or chemicals.
- The logo is on a coated, water-resistant, or flame-resistant garment where heat can damage the base fabric or its protective finish.
Workwear Logo Care Instructions for Employers and Uniform Managers
If you manage uniforms for a team, you control whether logos last or fail. A simple care policy saves money and keeps crews looking sharp. But care instructions alone are not enough, procurement, decoration quality, and replacement tracking all affect how long logos survive.
Procurement and Decoration Quality Checks
Before you accept a batch of branded uniforms, check the decoration, not just the garment:
- Ask for the wash rating. A quality transfer supplier should be able to state how many industrial wash cycles the decoration is rated for. If they cannot, treat that as a red flag.
- Inspect edge adhesion. Run a fingernail along the edge of the logo. If it lifts easily, the press was too cool, too fast, or too light.
- Check for dye migration. On polyester and blends, a logo that looks slightly muddy at delivery may worsen after washing. Press a sample and wash it before accepting the batch.
Workplace Laundry Guidance
For workplace laundries, print the care instructions from the garment care label and post them near the machines. Most uniform damage happens because nobody told the person loading the drum what not to do.
- Wash all branded garments inside out, in cold water (30°C or lower).
- Use mild detergent only, no bleach, no fabric softener.
- Check logos and reflective tape after every wash cycle.
If you use a commercial laundry service, confirm their process temperature and chemistry match the decoration's wash rating. Industrial detergents and high-temperature tunnel washers can strip adhesive faster than domestic washing.
A Simple Wash-and-Wear Test Protocol
You do not need a lab to compare decoration durability. Run a simple test before committing to a large order:
- Take two or three sample garments with the proposed decoration.
- Wash them together on the same cycle you expect in service, using the same detergent.
- After each wash, check for edge lift, cracking, colour change and adhesion consistency.
- Record the number of wash cycles before the first edge lifts, your practical wash-cycles-to-failure figure.
- Compare suppliers using the same protocol so the results are meaningful.
Useful measures to track:
- Wash cycles to failure, how many washes before the first edge lift.
- Edge lift, measured in millimetres from the logo edge.
- Adhesion consistency, whether all logos in a batch fail at the same rate or only some do.
Match Care to Job Conditions
A logo on an office polo needs far less care than one worn on a construction site, in rain, and through daily industrial washing. For heavy-use roles, choose embroidery over heat transfer and build replacement into your uniform budget. Track which roles generate the most logo failures and adjust procurement or care accordingly.
Keep a small repair kit on site: parchment paper, a compact heat press or iron, and spare transfers. Re-pressing a lifting edge the day you spot it saves the garment. Waiting a week usually means the whole logo is gone.
Conclusion
Logo peeling on work clothes is preventable, and it starts with the right garment, application and care routine. Control the heat, friction and chemicals, and your team's branding will hold up as well as the fabric.
At Hi Vis Work Clothes, we supply durable hi-vis workwear with custom printing or embroidery, reflective tape options, and all-weather jackets built for demanding job sites, gear made to keep your team safe, comfortable and professionally branded.
Get a quote from Hi Vis Work Clothes and kit your crew out in workwear that looks the part and lasts the distance.
Frequently Asked Questions
How do you stop a logo from peeling off work clothes?
Prevention starts with correct application and ongoing care. Apply heat-transfer vinyl at the right temperature, time and pressure for the fabric type. Always wash garments inside out in cold water with mild detergent, avoid fabric softener and bleach, and air-dry or tumble dry on low heat. Re-press lifting edges early with parchment paper before the damage spreads. Following these steps keeps adhesion strong through repeated wash cycles.
How should you wash work clothes with printed logos?
Turn garments inside out before washing. Use cold water and a mild detergent on a gentle cycle. Avoid fabric softener because it coats the adhesive and weakens the bond between the logo and fabric. Skip bleach entirely as it degrades both the print and the garment fibres. Wash printed items separately from heavy items like work boots or tool belts that cause abrasion during the cycle.
Can you put workwear with a heat-pressed logo in the dryer?
High heat is the main enemy of heat-pressed logos. If you must use a dryer, set it to the lowest heat setting and remove garments while slightly damp. Air-drying on a clothesline or rack is the safest option and extends logo life significantly. Avoid hanging printed garments in direct harsh sunlight for extended periods, as UV exposure can also degrade vinyl over time.
Can you repair a peeling logo on workwear?
Yes, if the peel is caught early. Place parchment paper over the lifting section and re-press with an iron or heat press at the original application temperature for 10-15 seconds. Apply firm pressure and let it cool completely before moving the garment. For larger lifts where the adhesive has failed across most of the logo, fabric glue designed for textiles can work as a temporary fix, but replacement is usually more reliable for professional uniforms.
Recent Blogs
October 06, 2026
Preventing Logo Peeling on Work Clothes: 2026 Guide
Stop logo peeling on work clothes. Learn heat press settings,...
October 06, 2026
Preventing Logo Peeling on Work Clothes: 2026 Guide
Stop logo peeling on work clothes. Learn heat press settings,...
October 06, 2026
Preventing Logo Peeling on Work Clothes: 2026 Guide
Stop logo peeling on work clothes. Learn heat press settings,...