
How to Wash Reflective Work Clothing


Table of Contents
- Why Proper Care Matters for Reflective Work Clothing
- Step 1: Check the Garment Care Label and AS/NZS 4602.1 Standards
- Step 2: Remove Loose Dirt and Pre-Treat Stains
- Step 3: Select the Right Detergent and Water Temperature
- Step 4: Wash Your Reflective Garments Inside Out
- Step 5: Choose Air Drying Over Tumble Dry
- Recognising When Reflective Tape Is Worn Out
- Common Mistakes to Avoid When Washing Hi-Vis Gear
- Frequently Asked Questions
Last Updated: September 2, 2026
Why Proper Care Matters for Reflective Work Clothing
Reflective work clothing keeps your team visible and safe, but that safety benefit only lasts as long as the reflective tape remains intact. Washing hi-vis gear incorrectly strips away the waxy film that enables reflectivity, fades fluorescent colours, or damages the tape itself, leaving your crew underprotected without realizing it.
Most teams treat hi-vis like regular workwear, using hot cycles and standard detergent. This destroys reflective tape faster than expected. The good news is that proper washing is straightforward once you know what matters.
Step 1: Check the Garment Care Label and AS/NZS 4602.1 Standards
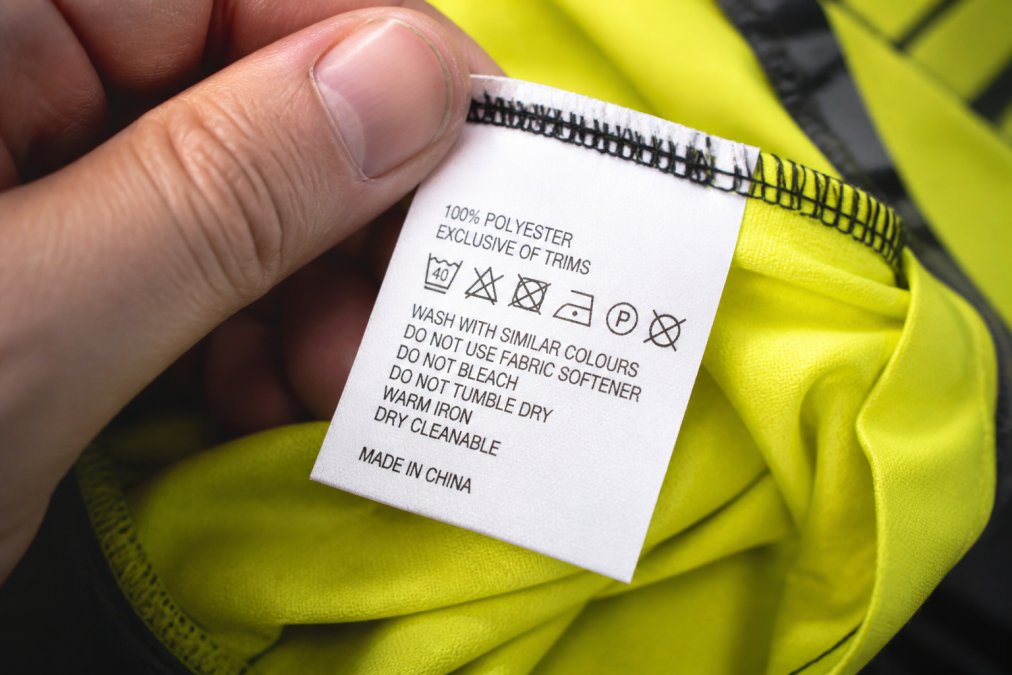
Every piece of reflective work clothing carries a garment care label. Read it first, the manufacturer knows their fabric blend and reflective tape construction better than anyone.
Look for specific guidance on water temperature, cycle type, and restrictions. If the label says "do not bleach" or "do not use fabric softener," that's a requirement to maintain reflective properties and durability.
Australian workwear must meet AS/NZS 4602.1 standards for high-visibility clothing (standards.org.au). This standard defines reflectivity requirements and testing methods. Improper washing can degrade retroreflectivity below compliance levels without visible damage.
If your hi-vis gear lacks a legible label, check the retailer's website or contact them directly. Knowing the fabric content tells you what water temperature and cycle the garment can handle.
Step 2: Remove Loose Dirt and Pre-Treat Stains
Before washing, brush or shake out loose dirt and debris. Use a soft brush to gently remove dust, mud, or grime clinging to the fabric and reflective tape. This prevents dirt from being ground into the fabric during the wash cycle.
For visible stains, pre-treatment is essential, but the method depends on what caused the stain. Industrial work sites expose hi-vis gear to contaminants that standard detergent alone cannot remove.
How to Remove Oil and Grease from Hi-Vis Clothing
For fresh oil stains, apply a small amount of dishwashing liquid directly to the affected area. Work it in gently with your fingers or a soft brush, then rinse with cool water. Don't use hot water, heat sets oil stains deeper into synthetic fibres and can soften the reflective tape adhesive prematurely.
For older, set-in oil stains, use a grease-cutting pre-wash treatment designed for workwear. Apply it sparingly, let it sit for 10-15 minutes, then gently agitate with a soft brush. Rinse thoroughly with cool water before washing. The key is gentle pressure and cool water.
Removing Tar, Bitumen, and Concrete Dust
For fresh tar or bitumen, allow it to cool and harden completely. Once solid, gently peel away as much as you can with your fingernail or a plastic scraper, never use metal tools. For residual staining, apply eucalyptus oil or a commercial tar remover, let it sit for 5 minutes, then gently rub with a soft cloth. Rinse thoroughly with cool water.
For concrete dust and cement splatter, brush away loose dust immediately. For dried cement, soak the area in cool water for 10 minutes to soften it, then gently scrub with a soft brush. If stubborn, use a weak solution of white vinegar (1 part vinegar to 3 parts water) to dissolve it, then rinse thoroughly.
Removing Chemical and Paint Stains
For water-based paint, rinse the area immediately with cool water whilst the paint is still wet. For oil-based paint, use a small amount of white spirit on a cloth, dab (don't rub) the stain, and rinse with cool water immediately. Limit exposure to 2-3 minutes maximum.
For unknown chemical spills, check your workplace's safety data sheets (SDS) for the product. When in doubt, rinse with cool water first, then consult your safety officer before using any solvent.
Step 3: Select the Right Detergent and Water Temperature
Water temperature is critical when washing reflective work clothing. Hot water softens the adhesive holding reflective tape in place and fades fluorescent colours faster. Lukewarm water, around 30-40°C, is the safe choice for hi-vis gear (peer-reviewed research).
Use a mild detergent designed for delicate or synthetic fabrics. Standard heavy-duty detergents are too harsh on the reflective coating. Look for detergents labelled as suitable for synthetic fibres or sports gear.
Avoid fabric softeners and bleach entirely. Fabric softeners reduce effectiveness, and bleach breaks down fluorescent dyes and can damage the tape adhesive.
Load the washing machine loosely. Cramming too many garments in one load prevents proper rinsing and can cause friction damage to the reflective tape.
Step 4: Wash Your Reflective Garments Inside Out
Turning your hi-vis inside out before washing protects the reflective tape from direct contact with agitation, detergent, and friction. The main fabric absorbs most of the mechanical action, leaving the reflective tape on the back safer. This simple step extends the life of your reflective work clothing significantly.
Use a gentle or delicate wash cycle, not a standard heavy-duty cycle. Gentle cycles use less agitation and shorter spin times, which means less stress on the tape adhesive and fabric.
Wash your reflective work clothing separately from other garments when possible. This prevents zips, buttons, and rough seams from snagging or damaging the reflective tape. If you must wash mixed loads, place hi-vis items inside a mesh laundry bag for extra protection.
Step 5: Choose Air Drying Over Tumble Dry
Tumble drying is the enemy of reflective work clothing. Heat softens the adhesive holding the reflective tape to the fabric, causing it to peel or lift. High heat also fades fluorescent colours faster and can damage synthetic fibres.
Air drying is the only safe option. Hang your hi-vis garments on a clothesline or lay them flat on a clean surface away from direct sunlight. Sunlight can fade fluorescent colours over time, so dry them in shade or indoors if possible.
Allow at least 24 hours for complete drying. Patience here pays off, your reflective work clothing will last significantly longer and maintain its compliance with safety standards.
Recognising When Reflective Tape Is Worn Out
Even with perfect care, reflective tape eventually wears out. Knowing when to replace a garment prevents your team from wearing hi-vis that no longer meets safety standards.
Signs of Reflective Tape Degradation
Look for these indicators that reflective tape is losing effectiveness:
- Visible peeling or lifting edges: The tape is separating from the fabric. Once this starts, it accelerates quickly.
- Dull or faded reflective surface: The tape no longer shines brightly when light hits it. Hold the garment under a torch in low light, if the reflection is noticeably dimmer than a new garment, it's time to replace it.
- Cracking or crazing: Fine cracks across the reflective surface indicate the coating is breaking down.
- Discoloration or yellowing: The reflective tape has faded significantly from its original colour.
- Loss of adhesion in patches: Sections of tape are loose or coming away from the garment, often first at seams or edges.
- Brittleness or stiffness: The tape feels hard and inflexible rather than slightly supple.
When to Repair vs. Replace
Repair is worth considering if:
- Only a small section of tape (less than 5 cm) is peeling or lifting, and the rest of the garment is in good condition.
- The tape is dull but not cracked, and the garment is otherwise undamaged.
- Damage is confined to a single strip or section.
Replacement is necessary if:
- More than one section of tape is peeling or lifting.
- The tape is cracked, crazing, or showing signs of structural breakdown.
- The reflective surface is significantly yellowed or discoloured.
- The garment has lost more than 20% of its original reflective tape coverage.
How to Patch or Replace Reflective Tape
If only a small section of tape is damaged, patching can extend the garment's life.
Materials needed:
- Replacement reflective tape (must meet AS/NZS 4602.1 standards)
- Scissors or a craft knife
- A clean, lint-free cloth
- Rubbing alcohol or a degreaser
Steps:
-
Clean the area. Use rubbing alcohol and a lint-free cloth to clean the section of fabric where the tape will be applied. Remove all dirt, dust, and residue from the old adhesive. Allow to dry completely (at least 5 minutes).
-
Remove old tape if necessary. If the existing tape is peeling, gently peel it away. Do not use heat or solvents to remove old tape, as these can damage the underlying fabric.
-
Cut the replacement tape. Cut a patch that overlaps the damaged area by at least 2 cm on all sides. Rounded corners adhere better and are less likely to peel.
-
Apply the new tape. Peel back one corner of the backing and align the tape carefully. Press down firmly, working from the centre outward to remove air bubbles.
-
Allow to set. Leave the garment undisturbed for at least 24 hours before washing or wearing.
Storage and Maintenance to Extend Tape Life
- Store in a cool, dry place. Heat and humidity accelerate adhesive degradation. Avoid direct sunlight, hot vehicles, or damp areas.
- Hang rather than fold. Folding creates creases that stress the tape adhesive. Hang garments on a peg or hanger to distribute weight evenly.
- Keep away from solvents and chemicals. Even fumes from petrol, paint thinners, or industrial cleaners can soften reflective tape adhesive over time.
- Inspect regularly. Check tape condition monthly, especially if garments are worn daily.
- Rotate garments. If your team has multiple sets of hi-vis, rotating them reduces wear on any single garment.
With proper care, quality hi-vis can last 1-2 years of regular use.
Common Mistakes to Avoid When Washing Hi-Vis Gear
Using hot water: Softens adhesive and fades colours. Stick to lukewarm (30-40°C) every time.
Fabric softener: Coats the reflective tape and reduces its reflective properties. Never use it on hi-vis gear.
Bleach: Breaks down fluorescent dyes and can damage the tape adhesive. Avoid it entirely.
Tumble drying: Heat is the enemy of reflective tape. Air dry only.
Washing with heavy-duty detergent: Too harsh on the reflective coating. Use mild detergent designed for synthetic fabrics.
Washing on heavy or standard cycles: These use too much agitation. Use gentle or delicate settings instead.
Overloading the washing machine: Causes friction damage to the reflective tape. Wash loosely.
Ironing reflective tape: Heat will melt the adhesive and damage the tape. Avoid ironing near reflective areas.
Storing damp hi-vis: Promotes mould and mildew. Always dry completely before storage.
Ignoring the care label: The manufacturer's instructions exist for a reason. Follow them exactly.
Washing reflective work clothing correctly protects your team's safety and extends the life of your protective gear. By following these steps, checking the care label, pre-treating stains, using lukewarm water and mild detergent, washing inside out, and air drying, you keep the reflective tape intact and maintain compliance with safety standards.
When it's time to replace worn-out hi-vis, Hi Vis Work Clothes provides durable, compliant reflective jackets, long-sleeve work shirts, and safety vests with 5cm reflective tape for maximum visibility. We offer custom printing and embroidery to keep your team branded and professional on site. Get a quote today and ensure your crew has protective clothing built to last.

Frequently Asked Questions
Q: Can you put a hi-vis in the washing machine?
A: Yes, most hi-vis work clothing can go in the washing machine, but always check the garment care label first. Use lukewarm water (30-40°C), a gentle cycle, and avoid fabric softeners or bleach, which can damage reflective tape and synthetic fibres. Washing inside out protects the reflective properties and extends durability. High temperatures and vigorous cycles risk peeling the retroreflectivity coating.
Q: How do I know if my reflective tape is worn out?
A: Signs your reflective tape is worn out include visible peeling or flaking edges, dull or faded appearance, reduced glow when light hits it, and visible adhesive gaps between the tape and fabric. If the tape no longer reflects light effectively during night-time visibility checks, the garment no longer meets AS/NZS 4602.1 standards and should be replaced to maintain workplace safety compliance.
Q: Does washing hi-vis clothing reduce its reflective properties?
A: Improper washing can damage reflective properties, but correct care preserves them. Avoid high temperatures, bleach, fabric softeners, and tumble drying, all degrade the retroreflectivity coating. Using lukewarm water, mild detergent, inside-out washing, and air drying maintains the reflective tape's performance over many wash cycles.
Q: How do I remove oil from hi-vis clothing?
A: Pre-treat oil stains immediately by applying a small amount of mild dishwashing liquid directly to the affected area. Gently rub and let sit for 10-15 minutes before rinsing with cool water. Wash separately in lukewarm water using standard mild detergent. Avoid hot water, which sets the stain. For stubborn industrial oils, repeat the pre-treatment or seek specialist industrial laundry services to protect the reflective tape.
This article was written using GrandRanker
Recent Blogs
September 03, 2026
How to Wash Reflective Work Clothing
Learn how to wash reflective work clothing safely without damaging...
September 03, 2026
How to Wash Reflective Work Clothing
Learn how to wash reflective work clothing safely without damaging...
September 03, 2026
How to Wash Reflective Work Clothing
Learn how to wash reflective work clothing safely without damaging...